 |
| Had this guy for ages and decided to do a bunch of wizards at once - he's the first of around half a dozen. More to come! |


 |
| For size comparison purposes ... he's quite tiny. |
My painted miniatures in 15mm and 25/28mm, covering all genres. https://www.facebook.com/One-of-My-Men-Became-Restless-100659928063858
|
| Had this guy for ages and decided to do a bunch of wizards at once - he's the first of around half a dozen. More to come! |
|
| For size comparison purposes ... he's quite tiny. |
 |
| The Mrs. and the children are in Russia ca 1812 (see link) cast as camp followers. Father didn't quite fit in there so he remains over 30 years in the future in London organizing a defense against God knows what. |


 |
| Eureka has a number of figures that are off the books and generally oop. This is one I cannot find on their site and was painted in the mid-'00s. |
 |
| He's supposed to be standing on carpeting but not sure that's obvious here. I probably should custom cut some red felt for this. |

 |
| Eyes a bit wonky, but otherwise ok. |
 |
| These 20 trees (bent wire with tape over it, mounted on a weighted plastic mound) were drugstore Halloween tchotchkes from quite few years ago that I had lying around. I think they were a dollar and a quarter each. I like the Citadel Woods - bought two kits, but I hate the rigid little canopies they include for the foliage. These trees look great from the top but from any other angle they look very unnatural. I hate leaving the canopy pieces (CWC) in the box, so midway through this tree basing project it struck me to incorporate them in as piles of fallen leaves. |


 |
| Here's the first step in my process - hot glue the trees to old DVD-Rs, then kill the glass smooth surface with white modeling paste. I wish I had thought to use the CWCs earlier, but it didn't occur to me until these had been sitting around for a few days as seen above. The principal problem I ad with this project stems (har har) from trying to disguise the unnatural mounds from which the trees are sprouting. The other thing is that these CWCs are not perfectly flat but rounded in a convex curve. Being quite rigid I didn't feel comfy flattening them as it may distort the leave pattern and more honestly, I couldn't be bothered to look up how to heat them in a way safe enough to not destroy them. |
 |
| Step 2 - glue down the railroad ballast - sand works perfectly fine here too. I use what I have on hand. |
 |
| The trees were purchsed jet black which works to my method perfectly. Here I've sprayed the entire thing with Rustoleum Camouflage dark brown. I jumped the gun and did it before the glue dried I think as you can still see the white paste peeking through. Not to worry - it all gets covered. |
 |
| I did what would be zenithal lighting with Rustoleum light brown covering just the tops of the trees, knowing the color's spillover effects would be fine. Then on the ground I did my usual mix of Graveyard Earth (from a quart I had mixed up at Home Depot), followed by the middle blend of Graveyard Earth and Khaki. I didn't do the final highlight here as I thought it should be darker under the leaf piles. I changed my mind on that later. |
 |
| Time to paint he the CWC leaf piles - the biggest in the most common brown colors, followed by orange, then russet, finally with the smallest being the rarest: yellow. I could have mixed them all up but didn't want to spend a ton of time picking out individual leaves on all of these fiddly pieces. This was almost entirely a dry brush job over Rustoleoum Camouflage dark brown again - a most useful product. |
 |
| Maybe you want to see more of what was on my table at the time? When I say I am crunched for space - I mean it. Yes even ancient Ral Partha paints get used once in while. |
 |
| Back to out problem - these CWCs don't all fit between the tree bases making some jut skyward to an unacceptable degree. I also could have cut some of the longer pieces down following some arbitrary line along the leaves, but by this point they were painted. I also could have left off the ones that didn't fit, but then I'd have bizarre odds and ends with no good purpose lying around. they were all going to get on there somehow. |
 |
| Another late discovery: because of their convex shape, the holes were going to be near the tops of the piles. That won't do and I wish I had thought of this sooner. It wasn't until I started trying to place them that I noticed those holes looked odd. Plus I didn't want little insects or spiders making homes in there (an unlikely occurrence =)). Little masking tape on the back, black paint on the top ... |
 |
| ... followed by gluing some commercially available "leaf litter" over the openings. Paint the what are now roots or fallen branches and Done. |
 |
| A final drybrush of khaki on it's own ... |
 |
| ... and time to just start gluing it all down. I used plain ol Elmer's white on all of this. Clump bushes from Woodland Scenics were used around the edges of the parts not touching the ground. Followed by my usual green grass mix - no tufts here. Glue is still wet in this shot so it looks like an inviting Spring setting. It dries a lot darker of course. I do these in phases: first the bushes to cover the gaps, second the grass to cover irregularities of the ground cover , and third I did more leaf litter to cover whatever errors remained obvious. |
 |
| And La! twenty trees on five bases for an Autumn setting. They'll join the other dead trees I have completed - see here. One thing about haunted wood is that they are not primarily composed of bare wood - it's the darkness of the thick foliage and shadowy canopy that contributes to the foreboding atmosphere. If the moon is shining down one can see quite clearly. |
 |
| In any event, the figures for these accessories will be visible. Some West Wind zombies seen here and below: |


 |
| I have a few more sprues of leaves left but am out of cheapo trees. I'll probably add them to other Autumn bases - with more advanced planning next time! |
 |
| Also painted in the early 00s |
 |
| I like these miniatures - don't need anymore than this little warband. I just identify and prefer other types of fantasy factions. |
 |
| Bowmen upclose |
 |
| Shield details - yellow is a problem for many folks - I was no exception though we have better tools for it now - among them are patience, and double thin coats, etc ... |
 |
| Found among other GW zombies that needed painting was this completed early unit of ghouls. Ghoul design has come a long way. I have more of the next gen done too but haven't come across them recently. |
 |
| Not easy to rank up quite properly, but the rules don't care. |
 |
| Also painted in the early 00s |
 |
| From the archives, completed in the early 00s .. I actually found a half dozen more of these primed and ready to go. (That's a Woodland Scenics HO scale grave.) |
 |
| I do like painting zombies - all your mistakes are forgiven! |
 |
| Ok - I made the best out of a bad situation. I'm a layer painter guy, always have been. I wash and drybrush and wet blend and use all kinds of techniques but I'd never "dipped", so I thought I'd give that a try on models I think are perfectly suited for it. |
 |
| These Blue Moon zombies aren't great models, have weird bases, and are simply skin and cloth - two have a club but the rest are unarmed and carry nothing but their wounds. I had assembled them years ago, but never got to them and figured dipping would be a perfect way to whip out forty models and not have to dwell on them excessively. |
 |
| Then in August last year, disaster struck! I thought I would prime them in their primary color as is the advice using Rustoleum Camouflage Tan (I've used the dark brown and love it). |
 |
| But it came out gritty and grainy and then wouldn't adhere, leaving highlights of metal visible wherever I handled them. A week or so went by so I washed them again and that seemed to knock off the loosest particles. Had tons of damp powder all over, but I brushed them off them let them dry again. I retrospect I think it was my fault - insufficient shaking and probably too hot of a day to spray. |
 |
| After knocking off the loose bits, maybe what remains can still work I figured. Luckily, Folk Art "Country Twill" is a near perfect match for this spray so I hand primed over all the metal bits, followed then by the Folk Art to make them again uniform. |
 |
| So far so good. There was still dusty miniatures to handle, but I then started to block in the colors. There's no real rhyme or reason to what they are wearing - just cloth, loincloths, "diapers" I've been calling them, dresses and skirts and what once were simple trousers. These are 2 part models and many of the tops were female and have to be matched up with the skirts. Most of the bottoms seem otherwise unisex. As it turns out one can get some cool models out of them. Of course these four in the front are my least favorite. |
 |
| There's basically nothing on them that tethers them to any definitive time period so I got to go very generic. Underlying the style was the impression to me that they are primarily wearing burial shrouds. Since they were buried, they may have died of natural causes or of old age, ergo, almost half are painted as if they were elderly - mostly the women models. |
 |
 |
| A quarter of them are bald so I just divvied up the remaining models in blonds and browns. |
 |
| Again, since there wasn't any identifiably modern clothing I blocked in off-white for most of the clothing. As I painted, the dustiness ebbed as I painted over it and knocked off the rest. (You can see the red brush-on primer on the bases here.) |
 |
| I did the clubs, the pants and the remaining clothes in "Dirt" then I dropped in some dark flesh on all the visible wounds. Incidentally, this work was done on the side over the course of several days. |
 |
| Nearing the end of blocking in the base colors |
 |
| I like the vacant blind eyes for zombies, popped those in and other details of revealed bones and organs, etc. |
 |
| Ok - colors are blocked in - ready to start dipping! |

| I used Pledge mixed with artists ink to suit. Plain brown turned out too "sepia" for me so I did a few in just black, then didn't care for that and did the rest in mostly black but with a few drops of brown in. I probably could do more to really enhance those shadows but the grit of the underlying primer was darkening everything more than I wanted to. To remedy - I went back in and painted the cloth again on the highlighted areas as well as the skin again focusing on the tops of the models. I quickly just dry-brushed toes and fingers to get the contrast to pop there. I don't love these guys so didn't want to spend yet more time on them so I was pretty sloppy. The Pledge base did add a smooth layer over everything so glad it also serves as a sealant. I think I'll still do a gloss and two matte coats after though just in case. |
 |
| My standard basing for non-urban zombies - no tufts or static grasses |


 |
| You can see the brown ink did nothing for the gray hair particularly so I went in and highlighted all those heads with off white and then white to bring the color back up. |
 |
| Why a tan undercoat? I always liked the look of the zombies in Resident Evil: Extinction (the Las Vegas one) - leathery, sun damaged instead of damp and moldy. Just mixing it up a bit. |

 |
| Less is more on the gore, but honestly the models have a billion wounds on them. If it's sculpted: I paint it. Here I just added old citadel Chestnut ink over all the wounds. |
 |
| Yes these models are pretty uniform in appearance and color. |
 |
| I don't like that the BM bases are framed in that band around the edges. Not pictured above is where I glued down some ballast in those corners to lessen the transitions there. Doing so improved it but not perfectly. The flock covered the worst of the little "steps" that remained and they are mostly invisible. |


 |
| Because of the framed bases I didn't do what I recommend EVERYONE do for the majority of their zombies: base them on multi-figure bases. Nobody likes moving all these around every turn. |
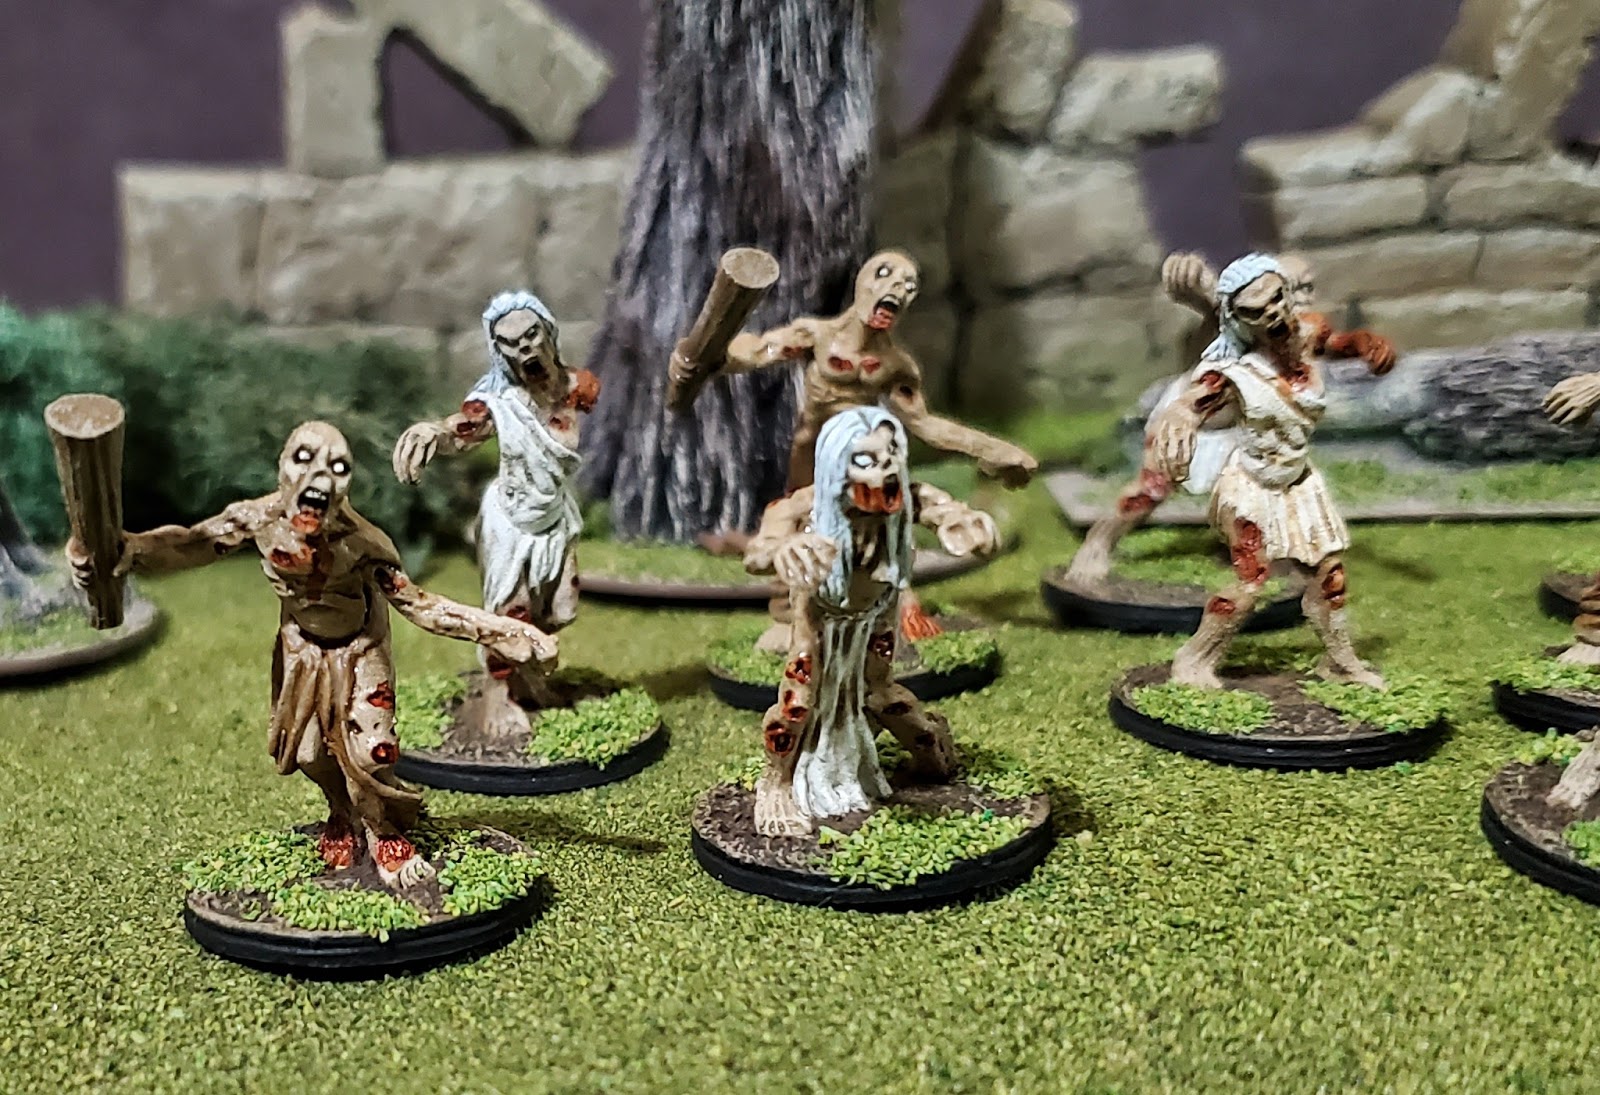 |
| All and all, these are fine. I needed yet more zombies like a hole in the head, and what I thought would be a quick project took about twice the time I had figured. That said, I'm happy with them, they are rank and file, look great en masse and are, at last, off my painting table. |
